Adelaide: How to Convert Manual Roller Shutter to Electric
Cranking manual roller shutters up and down every morning and evening gets old fast. Your shoulder aches, the strap frays or snaps at the worst moment, and when the Adelaide summer heat hits, the last thing you want is extra physical effort just to keep your home cool. If you’ve wondered whether your existing shutters can be upgraded without ripping everything out and starting fresh, the answer is usually yes.
Most roller shutters in Adelaide homes can be converted to electric operation by swapping out the manual winder mechanism for a tubular motor and controller. You’ll need the right motor size, a compatible axle, electrical connection or battery pack, and about an hour per window once you’ve gathered the parts. The total cost typically ranges from $400 to $650 per shutter, depending on whether you choose mains power or battery operation.
This guide walks you through the full conversion process, from checking your shutter’s compatibility and selecting the right motor to installation, testing and ongoing maintenance. You’ll also learn when to call a professional and how to source quality parts locally.
What to check before you convert
Before you learn how to convert manual roller shutter to electric, you need to verify that your existing setup can actually handle the change. Not every shutter is a good candidate, and skipping this assessment can lead to wasted money on parts that won’t fit or motors that strain and fail within months. Most domestic roller shutters with 40-60mm octagonal axles can be retrofitted, but damaged curtains, seized bearings or undersized headboxes can turn a straightforward job into a frustrating rebuild.
Inspect your shutter’s physical condition
Walk up to each window and give the shutter a close look. Check for bent slats, rust on the bottom bar, or foam inserts that have swollen from water damage. Wind the shutter up and down manually to feel for grinding or catching, then examine the side guides for cracks or debris buildup. A shutter that struggles under manual operation will only get worse with a motor pushing it, so repair any mechanical issues before you commit to the conversion.
A motor cannot fix underlying damage; it will only amplify existing problems and shorten its own lifespan.
Measure your headbox and axle
Pull the pelmet cover off and measure the internal headbox depth with a tape measure. You need at least 150mm clearance for a standard 45mm motor, or 180mm for heavier 60mm units. Confirm the axle shape (round or octagonal) and its diameter, because motor drive wheels are sized to specific axle profiles and a mismatch means the motor will spin freely without lifting the curtain.
Step 1. Confirm compatibility and plan power
Once you’ve confirmed your shutter is in good physical shape, you need to match the right motor to your axle and decide how you’ll supply power. Getting the sizing wrong means the motor either won’t fit or will lack the torque to lift the curtain, and choosing the wrong power option can mean extra electrician costs or inconvenient recharging. This step determines the parts list you’ll need and sets realistic expectations for installation time and cost.
Check axle and motor sizing requirements
Measure your curtain’s width and height to calculate total area in square metres. A typical Adelaide bedroom window (1.2m wide × 1.5m high = 1.8m²) suits a 10-20Nm motor, while larger patio doors (2.4m × 2.1m = 5.04m²) need 30-40Nm. Match your motor’s drive wheel to your axle profile, because a 50mm round axle requires a different adapter than a 60mm octagonal one.
| Shutter area | Motor torque | Axle compatibility |
|---|---|---|
| Up to 4m² | 10-20Nm | 40-60mm octagonal or 50mm round |
| 4-8m² | 30-40Nm | 60mm octagonal preferred |
| Over 8m² | 50Nm+ | Professional assessment required |
Decide on power source
Mains-powered motors (240V) deliver unlimited cycles and suit ground-floor windows near existing power points, but you must hire a licensed electrician to run the cable and install an RCD-protected spur. Expect $150-$250 in labour plus parts. Battery-powered systems avoid wiring costs entirely and work during blackouts, making them ideal for second-storey shutters or bushfire-prone areas. You’ll recharge the lithium pack every 9-12 months via a supplied charger, and replacement packs cost around $159 after 3-5 years.
If you’re converting multiple shutters and power points are scarce, battery operation keeps your total project cost predictable and eliminates electrician scheduling delays.
Step 2. Choose a motor and control option
With your compatibility confirmed and power source decided, you can now select the specific motor model and control interface that will operate your shutter daily. Your motor choice depends on curtain weight, available headbox space, and how often you’ll cycle the shutter, while your control option affects convenience, future-proofing, and whether you can integrate with smart home systems. Getting both selections right means smooth, quiet operation for years.
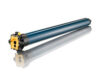
Select between tubular motor types
Tubular motors rated at 10-20Nm handle most Adelaide bedroom and standard-width windows (up to 4m² of curtain), fitting inside hollow 40-60mm octagonal axles. Look for Australian-certified units (AS/NZS compliant) with thermal overload protection, which stops the motor if it overheats during extended operation. Larger motors (30-40Nm) suit double-width doors or commercial roller shutters but require deeper headboxes (180mm minimum) and professional installation due to higher torque forces. Battery-powered tubular motors typically deliver 10-20Nm, recharge via standard USB-C or barrel-plug chargers, and complete 30-40 full cycles per charge.
Battery motors eliminate electrician costs entirely, making them the practical choice when you want to learn how to convert manual roller shutter to electric without rewiring your home.
Pick your control interface or call the experts on 0414611662 now
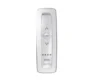
Wall-mounted switches cost $50-80 and offer simple up/down/stop buttons, perfect for hallways or bedrooms where you pass the shutter regularly. Remote controls add $70-120 to your budget but let you operate shutters from anywhere in the room, ideal for high windows or when furniture blocks wall access. Smart hub integration (via Zigbee or Wi-Fi bridges at $180-250) connects your shutters to Google Home, Alexa, or Apple HomeKit, enabling voice commands, scheduled opening times, and remote control via smartphone apps when you’re away from home.
Step 3. Install the motor and hardware
You’ve selected your motor and controls, so now it’s time to physically swap out the manual mechanism and install the new electric system. This step requires patience and careful handling of both the shutter curtain and electrical components, because rushing through it can strip threads, damage wiring, or misalign the motor in ways that cause premature failure. Most single-shutter conversions take 45-90 minutes once you understand the sequence, and having a helper stabilise the curtain while you work makes the job safer and faster.
Remove the manual winder mechanism
Lower the shutter fully and secure it with spring clamps or a block wedged in each side guide to prevent sudden drops when you disconnect the winder. Unscrew the faceplate from the wall-mounted winder box, then back out the coach screws holding the unit to the stud. Cut the nylon strap or steel tape near the winch with side cutters, then carefully pull the entire winding assembly away from the wall. Pop the pelmet cover off, loosen the axle retaining screw on the winder side, and slide the axle 30mm toward that side to expose the plastic gear wheel or tape drum. Lift out the old drive component and wipe dust from the axle bore so the motor’s drive wheel can seat cleanly.
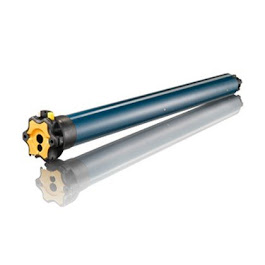
Fit the motor bracket and drive components
Position the supplied steel motor bracket against the winder-side frame, 20mm below the axle centreline, and secure it with two 10g × 16mm stainless self-tapping screws. Slide the crown and drive wheel onto your motor’s shaft, matching the profile to your 40mm or 60mm axle (round or octagonal). Feed the motor into the hollow axle until the drive wheel engages, then rotate gently until the arrow on the motor head points straight down. This vertical alignment keeps cable stress minimal and ensures the motor sits square in the headbox.
Connect and secure all hardware
If you’re using a battery motor, push the low-voltage barrel plug into the motor socket and mount the charger or solar panel in an accessible spot. For mains-powered motors, a licensed electrician must run 3-core flex (brown = active, blue = neutral, green/yellow = earth) through the wall cavity to an RCD-protected spur or plug base. Replace the nylon end caps and spring clips on both ends of the axle, then test manual rotation by turning the motor a half-cycle with the supplied hand tool. The curtain should roll smoothly without binding; if it catches, pull the motor 10mm out, realign, and retest before proceeding.
Correct motor alignment during installation prevents 90% of post-conversion noise and vibration issues that plague rushed jobs.
Step 4. Test, maintain and get help
After you’ve installed the motor and confirmed the curtain rolls smoothly, you need to teach the system where to start and stop, establish a maintenance routine, and understand when professional help beats DIY troubleshooting. Skipping limit programming leads to curtain jams or motor strain, while neglecting basic upkeep shortens the lifespan of your conversion investment. This final step ensures your newly electric shutter operates reliably for years and that you know exactly when to reach for the phone instead of the toolbox.
Program limits and test operation
Press the motor’s UP button and release it 10mm before the curtain reaches the pelmet, then hold the “P2” or limit-set key until the curtain jogs once to save the upper limit. Repeat for the DOWN position, stopping just before the bottom bar hits the sill. Test the full cycle five times, checking that the shutter stops consistently at each limit and reverses slightly if it meets resistance. If the curtain overruns or stops short, recalibrate by clearing existing limits (consult your motor’s manual) and reprogramming from scratch.
Correct limit settings prevent slat crush and motor overheating, the two most common causes of early conversion failure.
Schedule regular maintenance
Wipe slats with soapy water and spray silicone lubricant into the side guides every six months, then cycle the shutter twice to distribute the coating. Once yearly, tighten all side-plate screws, recharge or replace battery packs on wireless motors, and inspect the headbox for water ingress after heavy Adelaide storms. Clear any grit from the bottom bar and guides immediately to prevent scratches or jamming.
Know when to call a professional
If you smell burning, hear grinding noises despite lubrication, or the RCD trips repeatedly, switch off power and contact Roller Shutter Repairs Adelaide on 0424 888 272 for same-day diagnostics. Motor replacements, axle realignments or complex smart-home integrations also benefit from experienced hands who’ve completed hundreds of conversions across Adelaide suburbs.
Bring your Adelaide shutters up to date
Learning how to convert manual roller shutter to electric transforms daily life in ways you won’t fully appreciate until the first morning you press a button instead of cranking a handle. Your converted shutters deliver instant convenience, improved security through scheduled closing times, and smooth operation that extends the curtain’s lifespan by eliminating the jerky hand-winding motion that stresses slats and guides. You’ve invested $400-650 per window, so protecting that investment with regular maintenance and knowing when to seek expert help ensures decades of reliable service.
If you’d rather skip the DIY process entirely or need professional assistance with a tricky installation, Roller Shutter Repairs Adelaide handles conversions across all Adelaide suburbs with no call-out fees and same-day service availability. Ring 0414611662 to book an assessment, get an upfront quote, and have your shutters upgraded by technicians with over 40 years of combined experience serving South Australian homes.