How to Convert Manual Roller Shutters to Electric: Adelaide
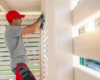
Cranking a stiff winder, nursing a frayed strap, or leaning out a second‑storey window isn’t anyone’s idea of convenience. If your manual roller shutters are getting harder to use—or you’d simply like smoother, quieter control with a button press or phone tap—motorising them is a practical upgrade that adds comfort, accessibility and reliability.
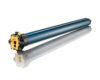
The good news is most existing shutters can be converted without replacing the curtain or guides. A compact tubular motor slips inside the axle and runs from 240 V, battery or solar, with installs often completed in under an hour per window. It’s typically cheaper than new shutters and can integrate with remotes, timers and smart home platforms. Licensed electrical work is required for mains power, but battery and solar options keep wiring minimal.
This Adelaide-focused guide walks you through the whole process: confirming suitability, measuring and sizing the motor, picking power and controls, budgeting parts, safety and compliance, the key installation steps, programming, testing, weatherproofing and ongoing care. We’ll also cover local costs, realistic timelines and when DIY makes sense versus calling a local expert—so you can decide the best path and get your shutters moving smoothly.
Step 1. Confirm your roller shutters can be converted
Before you buy parts, make sure your shutter will accept a tubular motor. In Australia, most domestic units with a 40–60 mm octagonal axle can be retrofitted, but a few checks prevent costly surprises when you convert manual roller shutters to electric.
- Curtain health: slats straight, foam not swollen, end locks intact.
- Axle: octagonal, hollow, spins smoothly and stays level in the guides.
- Headbox clearance: around 150 mm clears most 45 mm motors; about 180 mm for 60 mm units.
- Power access: nearby GPO or choose battery/solar; any 240 V work needs a licensed electrician and RCD protection.
- Roll size and guides: curtain shouldn’t overfill the box; guides clean and unobstructed.
Step 2. Measure your shutter and size the motor
Accurate sizing is what makes a quiet, long‑lived conversion. To convert manual roller shutters to electric reliably, record the clear opening width between guides, the drop from sill to inside the headbox, the axle profile/diameter (typically 40 or 60 mm octagonal) and headbox depth. Slat type matters too—heavier extruded slats need more torque. If you know the curtain weight, use the rule of thumb: Torque (Nm) = (curtain weight kg × axle radius m) ÷ 0.8. If you don’t, pick from proven ranges.
- < 900 mm wide: 10 Nm motor
- 900–1800 mm: 20 Nm
- 1800–2400 mm or heavy slats: 40 Nm+
- Match parts: Use the correct 40 mm or 60 mm octagonal drive wheel to prevent slippage
Step 3. Choose your power and control option (240 V, battery, or solar) call the professionals 0414611662
Power and controls determine how you’ll use your shutters day‑to‑day. For most Adelaide homes, 240 V suits large, high‑use openings; battery is ideal for upstairs retrofits with no wiring; solar works well on sun‑exposed facades. If you convert manual roller shutters to electric with mains power, a licensed electrician and RCD protection are mandatory.
- 240 V hard‑wired: highest torque (great for big/heavy shutters) and unlimited cycles; requires cabling, isolator and a licensed sparkie (AS/NZS 3000).
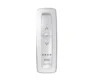
- Battery pack: no fixed wiring, long intervals between charges on typical bedroom windows, and still operates during blackouts; periodic charging and lower torque than mains.
- Solar: panel trickle‑charges the battery; needs a clear, north‑facing aspect and mounting space.
For control, choose a wall switch, RF remote, or a smart hub (Wi‑Fi/Zigbee) for groups, timers and voice control. Pairing steps vary by brand and will be covered later.
Step 4. Budget the conversion and source parts or kits
Plan the spend before you convert manual roller shutters to electric. In Adelaide, a typical single‑storey retrofit lands around $550–$900 per window fully installed (motor, controls, labour and electrician). DIY battery kits often total $377–$428 delivered for OZRoll L10/T20 with controller and charger—handy where running mains is impractical.
- Motor: $260–$350
- Controls: $50–$80
- Electrician (240 V): $150–$250
- Installer labour: $100–$200
- Small parts: axle adapters/drive wheels ~$10.50–$16.50+
Choose an all‑in‑one kit for compatibility, or pick‑and‑mix if you’ve got 40/60 mm axle quirks or want a specific smart hub. Confirm the correct crown/drive, bracket and receiver/switch for your chosen control style.
Step 5. Prepare tools, site access and safety compliance
A smooth retrofit starts with a tidy workspace and the right kit. For any 240 V work, book a licensed electrician (AS/NZS 3000) and ensure RCD protection and isolation. Use a safe platform and a helper where possible—good prep makes it quicker to convert manual roller shutters to electric.
- Tools: cordless drill (3 mm/5 mm bits), insulated screwdrivers, nut driver
- Test gear: multimeter and non‑contact voltage tester, RCD tester
- Cabling: fish tape, cable clips/conduit, grommets
- Access: step ladder or platform, clear floor area
- PPE: safety glasses, cut‑resistant gloves, hearing protection
- Safety: lock‑out/tag, clamps/blocks ready to secure the curtain
Step 6. Lower the curtain and remove the manual winder – call the professionals 0414611662
This is the critical “control the load” moment. Before you convert manual roller shutters to electric, get the curtain safely down and locked so nothing drops unexpectedly. Work with a helper and take your time—bent slats and bruised fingers come from rushing.
- Wind the shutter fully down; have a helper hold the bottom bar, then clamp it to the sill or wedge blocks in the guides.
- Cut the strap/tape near the winder, keeping the curtain secured.
- Remove the winder box faceplate, back out the fixing screws/coach screws, and lift the assembly off the wall; cap or patch the hole (handy for future cabling).
- Open the pelmet, loosen the axle retaining screw, slide the axle about 30 mm toward the winder side, and lift out the tape drum/gear—discard it.
- Deburr the axle bore and wipe out dust so the motor drive seats cleanly.
Step 7. Fit the motor bracket and insert the tubular motor
Precise alignment here is what keeps your conversion quiet and reliable. With the curtain secured and the old drum removed, position the bracket and motor so the axle and drive mate cleanly, cables aren’t twisted, and the curtain rolls level when you convert manual roller shutters to electric.
- Fit the bracket: Hold it flush to the side frame about 20 mm below axle centre; notch facing the headbox. Pre‑drill and fix with stainless self‑tappers.
- Prepare the motor: Slide the crown and drive wheel onto the motor to match a 40 mm or 60 mm octagonal axle.
- Insert and seat: Feed the tubular motor into the hollow axle until the drive “bites”; rotate so the motor head arrow points down, then clip into the bracket with the cable stress‑free.
- Check rotation: Refit end caps/clips and turn the motor a half‑cycle by hand. If it binds or goes off‑level, pull back ~10 mm, realign, and retest.
Step 8. Route cabling and connect power (or mount battery/solar)
With the motor seated, this step ties the mechanics to safe, tidy power. If you convert manual roller shutters to electric using 240 V, a licensed electrician must complete or sign off all fixed wiring to AS/NZS 3000 with RCD protection. Battery and solar avoid mains wiring but still deserve careful routing and strain‑free terminations.
- Run the cable (240 V): Drop a 3‑core flex down the nearest stud bay, avoid horizontal runs, keep a ~25 mm bend radius, and sleeve in 20 mm conduit where it exits masonry/pelmet. Staple about every 300 mm, leave a small service loop at the motor, grommet and silicone the exit.
- Terminate (240 V): Brown = Active, Blue = Neutral, Green/Yellow = Earth. Connect via a fused, RCD‑protected spur or plug base, then isolate and complete polarity/insulation/RCD trip tests.
- Battery option: Push the low‑voltage barrel plug into the motor, mount the controller/dock where it’s easy to charge, and secure the lead with UV‑safe clips.
- Solar option: Mount the panel facing true north at roughly 30°, keep it clear of shade, clip the cable neatly, add a drip loop, and connect to the battery/controller.
Step 9. Program travel limits, pair remotes and set up smart control
With power on, teach the motor its travel and pair controls. Accurate limits are vital when you convert manual roller shutters to electric—protecting slats and keeping motion smooth. Pair the remote by pressing the motor’s P2 twice (jog), then pressing the remote’s UP (jog). For smart hubs, add the device in the app and link Google Home/Alexa.
- Upper: run UP, stop 10 mm early; hold P2/limit to save.
- Lower: run DOWN, stop before sill; hold P2/limit to save.
Step 10. Test operation, obstacle safety and noise levels
Before you button it up, run full up/down cycles. After you convert manual roller shutters to electric, confirm level travel, no guide rub, quiet operation and precise stopping at the programmed limits. Watch for any hesitation or binding and correct before proceeding.
- Obstacle test: Place a rolled towel in a guide; it should stop and retract slightly. If not, increase the motor’s sensitivity per the brand instructions.
- Noise/fault clues: scraping = misalignment; hum/no movement = reseat and tighten the drive wheel; random stops = re‑teach limits or clear debris.
Step 11. Seal, weatherproof and refit the pelmet
A neat, weather‑tight finish protects the motor and keeps things quiet. After you convert manual roller shutters to electric, take a minute to seal penetrations and refit the cover so wind, dust and water can’t creep in or rattle components loose.
- Grommet the cable exit: then add a bead of neutral‑cure silicone.
- Create strain relief: leave a gentle service loop; don’t pinch cables.
- Secure the pelmet lid: clip on and tighten all side‑plate screws.
- Tidy cabling: use UV‑safe clips; keep leads clear of the rolling curtain.
Step 12. Plan maintenance and basic troubleshooting
A simple routine keeps newly motorised shutters smooth and extends motor life. After you convert manual roller shutters to electric, schedule quick seasonal checks; most hiccups are minor and fixable in minutes. If you smell burning or an RCD trips, stop and isolate power.
- Every 6 months: wipe slats, silicone the guides, check remote batteries.
- Annually: re‑teach limits, tighten side‑plate screws, recharge/replace lithium packs.
- Quick fix – hums/no lift: reseat and tighten the drive wheel on the axle.
- Quick fix – stops mid‑travel: re‑teach limits; clear debris in guides.
- Call a pro: burning smell, repeated RCD trips, or persistent snagging.
Step 13. Understand costs and timelines in Adelaide
For most Adelaide homes, expect $550–$900 per shutter fully installed (motor, controls, installer and licensed electrician) for a standard single‑storey retrofit. If you’re supplying parts, OZRoll‑style battery kits typically total $377–$428 delivered, parts‑only. Motors alone commonly sit around $260–$350, with electrician labour $150–$250 and installer labour $100–$200. This is the practical price range to convert manual roller shutters to electric without replacing the curtain.
- Access and height: ladders/scaffolds add time and cost.
- Power route: long or tricky 240 V cabling increases labour.
- Size/weight: wider or extruded slats need higher‑torque motors.
- Controls: remotes, hubs and groups add setup time.
On the day, allow roughly 30–60 minutes per shutter, depending on access and wiring; leave extra time for smart‑home setup and final compliance testing.
Step 14. DIY versus professional: when to call an Adelaide expert
Some jobs are fine DIY; others need a pro in Adelaide. Battery or solar on a ground‑floor window with a healthy curtain and a 40–60 mm octagonal axle is usually safe to convert manual roller shutters to electric yourself.
- 240 V hard‑wiring and compliance (AS/NZS 3000, RCD) — licensed electrician only.
- High access, large/heavy slats, or persistent binding/scraping.
- Non‑standard axles, tight headboxes, or tricky cable routes.
- Burning smell, obstacle safety failure, or repeated RCD trips.
Step 15. Get a fixed quote and book your conversion in Adelaide
Ready to lock in price and date? We’ll provide a fixed, itemised quote to convert manual roller shutters to electric before any work starts—no call‑out fees, clear inclusions and timelines across all Adelaide suburbs. Most bookings are available quickly, with on‑site installs typically 30–60 minutes per shutter.
To get a fast fixed quote, send:
- Suburb and address
- Number of shutters and sizes (width × drop)
- Axle profile (40/60 mm octagonal) and headbox depth
- Photos: pelmet open, guides, current winder
- Access details: floor level, exterior access
- Power preference: 240 V, battery or solar; control type
- Known issues: bent slats, jamming, noise
Once accepted, we’ll confirm parts, schedule a licensed electrician if required, and book your conversion.
Wrap up and next steps
You’ve got the whole playbook to convert manual roller shutters to electric: confirm suitability, measure and size the motor, choose 240 V, battery or solar, fit, wire, program, test, seal and maintain. Done right, you’ll gain quieter operation, one‑touch control and safer, more reliable shutters.
If you’d like a fixed, itemised price and a fast install slot, send your sizes and a couple of photos and we’ll handle the rest—licensed sparkie where required, neat finish, no call‑out fees, all suburbs. Get started with Roller Shutter Repairs Adelaide and book your conversion today.