Roller Shutter Battery Replacement Kits, Costs & DIY Steps
A roller shutter that grinds to a halt halfway up the window is usually blaming one thing: a tired battery pack. The good news is you don’t need an electrician or a brand-new motor. Purpose-made replacement kits—complete with plug-and-play connectors—can be ordered online for about $70 to $150 and swapped over in less than an hour with a screwdriver and a steady hand. Grab the right pack, give it a full charge, and your shutter should glide again as smoothly as the day it was installed.
This guide walks you through every step of that process. You’ll see side-by-side comparisons of the most popular Australian battery kits, a frank rundown of real-world costs, and a clear DIY walkthrough (with photos) for first-timers. We’ll also cover early warning signs of battery failure, pro maintenance tips that double service life, and safe disposal options for the old pack. Let’s get your shutters moving.
1. What a Roller Shutter Battery Replacement Kit Actually Includes
Skip the guess-work—modern kits arrive as a fully-built pack you can click straight into the controller, no soldering or heat-shrink required. Unlike a loose battery cell, a “kit” bundles every part you need for a same-day swap:
- Pre-assembled 12 V battery pack with integrated Battery Management System (BMS)
- Polarised plug or flying lead that matches the shutter controller
- Plastic cradle or foam-in bracket to stop vibration damage
- Mounting screws or retaining clips
- Quick-start sheet and, on premium models, a wall charger
Common Australian systems include OzRoll E-Port/ODS, PowerSmart, Apollo, CW Products and generic 12 V packs used by many installer-branded shutters. Older units relied on sealed lead-acid or NiMH chemistry; both are heavy and lose capacity fast. Today almost every replacement ships with a 18650-based lithium-ion stack—around one-third the weight, capable of >1 000 charge cycles and a flatter discharge curve for smoother motor torque.
Voltage is always 12 V, but capacity varies from 1.3 Ah on budget packs to 3 Ah on “long-run” upgrades. Matching both voltage and connector style to your controller is crucial; a 12 V Li-ion pack that ships with a JST-VH plug will not mate with an OzRoll two-pin polarised socket.
How to Identify the Correct Kit for Your Shutter –
call us and we can help 0414611662 or email is a picture at admin@rollershutterrepairsadelaide.com.au
- Find the model number on the handheld controller, wall switch or motor head.
- Read the part number stamped on the existing pack (e.g. OzRoll 15.260.000).
- Photograph the connector—note shape, colour and keying.
- Measure pack length and width if it slides into a housing.
- Cross-check specs on the manufacturer’s website or the installation manual. When in doubt, email the photo set to a reputable parts supplier before buying.
A genuine OzRoll or PowerSmart kit costs more, but you’re guaranteed correct firmware handshake and local warranty support. After-market packs can save $40 and may even offer extra amp-hours; just weigh that saving against the hassle of a potential mis-fit or early cell failure. Either way, buying the right roller shutter battery replacement kit up front will save hours of troubleshooting later.
2. Warning Signs Your Roller Shutter Battery Is Failing
Batteries rarely die overnight—they fade. Spotting the fade early saves the motor from strain and you from an urgent call-out. If any of the symptoms below crop up more than once or twice, pencil “roller shutter battery replacement” on your weekend to-do list.
- Sluggish travel or a jerky start that needs a helping hand
- Shutter only moves half-way before stopping and beeping
- Low-battery LED or repeated alert tones on the controller
- Pack feels hot, has visible swelling, or emits a sweet chemical odour
- Charger runs for hours yet runtime keeps shrinking
- Age benchmarks: 3–5 years for NiMH, 5–7 years for Li-ion before noticeable drop-off
A failing pack delivers lower voltage under load, so the motor draws extra current; left unchecked this can toast both the controller and gear-train.
Quick Home Tests Before Buying a New Battery
- Fully charge overnight, then cycle the shutter up and down. If it stalls in under five trips, capacity is shot.
- Multimeter test: with the shutter moving, probes on the battery terminals should read
≥11.5 V. Anything lower signals replacement time. - Have two shutters? Swap packs. If the fault follows the battery, you’ve found the culprit.
Could It Be Something Else?
Not every stoppage is battery-related:
- Tripped fuse or circuit-breaker in the controller
- Coin-cell in the remote flat (easy to overlook)
- Damaged cable where the controller docks
- Jammed curtain or worn motor limits—check by inserting the manual override crank and turning gently (yes, you can open an electric shutter by hand in most cases)
Rule these out first; you’ll avoid buying a new battery when the real fix is a $2 fuse or a quick spray of silicone in the tracks.
3. Side-by-Side Comparison of Popular Replacement Kits in Australia
Not all 12 V packs are created equal. Chemistry, cell grade and on-board electronics vary wildly, and that flow-on affects runtime, recharge speed and—of course—price. The table below puts the most common Australian roller shutter battery replacement kits shoulder-to-shoulder so you can spot the stand-out features at a glance.
| Brand / Kit | Chemistry | Capacity (Ah) | Compatible Controllers | Avg. Price (AUD) | Warranty |
|---|---|---|---|---|---|
| OzRoll L10 / ODS Smart-Drive Kit | Li-ion (18650) | 1.5 | OzRoll E-Port, ODS Series 10 | $150 | 24 mths |
| PowerSmart Removable Pack | Li-ion | 2.0 | CW Products “PowerSmart” rails & remotes | $150 | 24 mths |
| Apollo E-Port 12 V Kit | Li-ion | 1.9 | Apollo & most re-badged OzRoll controllers | $120 | 12 mths |
| eBay “No-Name” Re-cell Pack | Li-ion (unknown brand) | 3.0 (claimed) | Matches OzRoll 2-pin but plug often unkeyed | $69 | 6 mths (seller) |
Why the price spread? Premium kits use matched, brand-name cells, an integrated Battery Management System (BMS) that balances each cell bank, and molded housings that lock into the controller with zero wiggle. Budget packs cut costs by using mixed-batch cells, thinner gauge wiring and a one-size-fits-all shell. For a single shutter you’ll barely save $50 going cheap, but you might lose half the cycle life.
Key Buying Criteria Beyond Price
- Plug orientation and cable length—no adaptor equals no headaches
- Charger amperage: 1 A = 6-hour top-up; 500 mA may take overnight
- Impact & splash rating (IP 54+ recommended for outdoor wall docks)
- Stock availability—if the shutter is stuck closed, a three-week back-order is a deal-breaker
- Local support: can you ring someone if the BMS starts beeping at 2 am?
Where to Buy: Online vs Local Stores or call us on 0414611662 we can send them out/replace them for you
Specialist parts sites (rollershutterblindsonline, homeautomation&tubularmotors, classicrollershutters) carry fresh-dated stock and publish wiring photos—handy for first-timers. Bunnings will special-order in OzRoll packs, but expect week’s wait. If you live outside metro Adelaide, factor in courier delays and choose a vendor that supplies a pre-paid recycling satchel for the old battery—less mess, fewer landfill headaches.
4. How Much Will Replacing the Battery Really Cost?
Budgeting for a roller shutter battery replacement is straightforward once you break the job into its component parts:
- Battery kit: $70–$150
- Charger (if yours is missing or obsolete): $30–$50
- Misc. tools: most homes already have a Phillips driver and Torx bit; add $20 for a basic multimeter if you want to test voltage
- Optional professional labour in Adelaide: $120–$250 call-out, usually inclusive of the first 30–60 minutes on site
Spare a line for freight. Lithium packs must travel by road courier, so express shipping can add another $15–$25, especially to outer suburbs or country SA.
- Wrong part? Return freight and a second week with a stuck shutter.
- Downtime security risk if the window fronts the street.
- Potential damage to a near-new controller if you mis-align pins.
Saving Money Without Cutting Corners
- Replace multiple packs together to grab multi-buy discounts and cut shipping to one parcel.
- If your Neighbour has the same system, borrow their charger for the initial top-up.
- opt for a higher-capacity pack (e.g., 2.6 Ah) so you halve the charge cycles—pay an extra $20 now, postpone the next replacement by a couple of years.
When Paying a Pro Makes Sense – 0414611662
- Shutters are mounted on high windows, needing ladders or scaffold.
- The system is still under warranty and you don’t want to void it.
- Symptoms suggest a deeper issue—motor limits, jammed curtain or a blown PCB—as flagged in Section 2. A technician will diagnose everything in one visit and often carries loan packs, meaning your roller shutter is secure again before they drive off.
5. Step-by-Step DIY Battery Replacement Guide
Swapping a roller shutter battery replacement kit is closer to changing a power-tool pack than rewiring a house. The whole job can be done on the kitchen table, yet a little prep prevents 90 % of rookie mishaps. Use the walk-through below as a generic roadmap, then cross-check the fine print in your brand’s manual before you start.
Safety First: Tools, PPE & Precautions
- Phillips #2 and #1 screwdrivers
- Torx T10 bit (OzRoll uses this size)
- Small flat-blade driver for cable latches
- Multimeter (optional, for voltage check)
- Soft cloth or towel to protect the controller housing
- PPE: safety glasses and thin nitrile gloves
Precautions
- Disconnect the wall charger and let residual power bleed off for 60 s.
- Work on a non-conductive surface; metal benchtops invite accidental shorts.
- Keep children and pets clear—small screws are choking hazards.
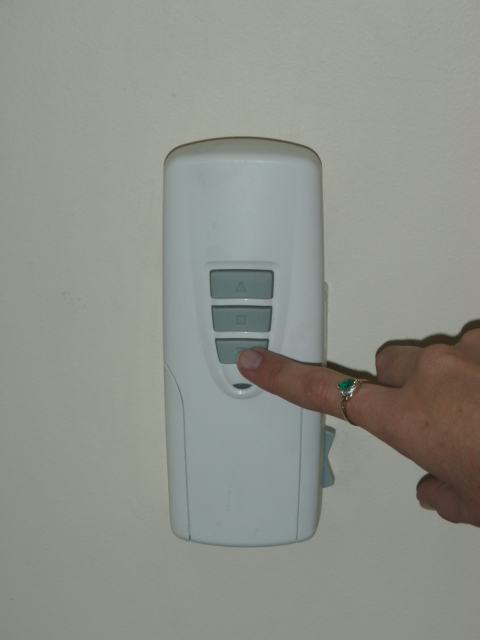
Removing the Old Battery Pack
- Lift the controller out of its wall cradle and place face-down on the cloth.
- Undo the four to six case screws; store them in a cup so they don’t escape.
- Gently separate the halves—don’t yank; a ribbon cable may link the keypad.
- Snap a quick phone photo of the wiring layout for reference.
- Depress the locking tabs on the battery connector and pull the plug straight out.
- Slide or lift the old pack from its cradle. If it’s snug, lever lightly with the flat-blade—no prying on the circuit board.
Installing the New Battery Pack
- Compare connectors; the polarized key should line up without force.
- Seat the pack into the cradle, ensuring no wires are trapped under the cells.
- Plug the connector in until you hear or feel the click.
- Re-fit the housing, tightening screws diagonally so the gasket seals evenly.
- Wipe fingerprints off the keypad—oil can seep into the buttons over time.
First Charge & System Reset
- Dock the controller, plug in the charger and leave it undisturbed until the LED turns green. A 1 A charger typically needs 6–8 h for the first 100 % top-up.
- Most controllers auto-calibrate, but if travel limits drift hold the
UPandDOWNbuttons together for five seconds; the shutter will run a full cycle to relearn its stops.
Testing and Troubleshooting
- Run the shutter fully up and down three times. Listen for stutters or stalls.
- If it stops mid-way, check tracks for obstructions, then confirm the battery voltage under load is
>11.5 V. - Persistent beeping after charge often means a faulty charger—measure output; it should sit at
≈14.4 V / 0.9 Afor most 12 V Li-ion systems. - Shutter moving the wrong way? Connector may be reversed—power down, flip it, and retest.
Complete these steps and you’ve just saved a call-out fee, extended the life of your motor and restored smooth, silent security to your window.
6. Maximizing the Life of Your New Battery
A fresh pack should give five-plus years of trouble-free service, but only if you treat it kindly. The three killers of lithium shutters batteries are deep discharge, excessive load and temperature extremes. Keep the voltage above 20 % charge whenever possible; the internal BMS will thank you. A quick top-up every fortnight is far gentler than running the cell bank flat and forcing a lengthy, high-current recharge.
Mechanical drag is the silent capacity thief. Dust-filled tracks or mis-aligned slats make the motor pull extra current, heating both the controller and the battery. A two-minute wipe with a microfiber cloth and a squirt of silicone spray every few months can claw back dozens of cycles.
Weather also matters. Dock-mounted packs hate direct sun and winter frost alike. Fit a small polycarbonate visor over exterior cradles, and in southern states pop the handheld controller indoors overnight when temps dip below 5 °C. NiMH owners should run a deliberate full discharge/charge every quarter to keep the cells balanced; Li-ion packs only need this refresh if the maker specifically recommends it.
Preventive Maintenance Checklist (Printable Table)
| Task | Frequency | Why It Matters |
|---|---|---|
| Top-up charge to 100 % | Fortnightly | Avoids deep discharge stress |
| Visual track clean & spray | Monthly | Reduces motor load and current draw |
| Runtime test (full cycle) | Quarterly | Spots capacity drop before failure |
| Full discharge/recharge (NiMH only) | Quarterly | Re-balances cell voltages |
| Inspect charger cable & plug | Bi-annual | Prevents arcing and slow charging |
| Check controller seals/hood | Bi-annual | Stops rain or UV degrading the pack |
| Measure voltage under load | Annual | Confirms battery health ≥ 11.5 V |
Stick this chart on the inside of a kitchen cupboard and tick tasks off with a marker—future you (and your wallet) will be chuffed.
7. Post-Replacement Problems & Quick Fixes
Nine times out of ten a fresh battery pack brings the shutter back to life. That remaining ten per cent can be maddening, but most glitches are simple wiring or setup oversights you can clear in minutes.
Common hiccups and their cures:
- Shutter won’t move at all – open the controller again and make sure the battery plug is fully home. Give the motor a quarter-turn with the manual override key; if it moves freely the issue is electrical, not mechanical.
- Controller still dead – many units hide a 1 A glass fuse beside the charge socket. Pop the cover; a blackened filament means it’s blown. Replace with the same rating.
- Shutter runs backwards – the two-pin connector is reversed. Power down, flip the plug, re-test.
- Endless beeps after charging – the temperature sensor lead may be loose. Reseat the tiny JST plug or cable-tie it so it can’t vibrate free.
When the Issue Is Not the Battery
If the curtain jerks or stops at random heights the motor end-limits or gearbox could be worn. Grinding noises point to a jammed slat or bent track, while a controller that resets its clock suggests a failing PCB, not the battery.
Escalation Path
You’ve checked plugs, fuses and sensors yet the shutter still sulks? Call the brand’s tech help for firmware quirks or book a local roller shutter technician. A pro carries spare motors, control boards and diagnostic gear—handy when the fault goes deeper than a 12 V pack.
8. Responsible Disposal of Old Roller Shutter Batteries
Australia classifies spent lithium-ion and NiMH packs as hazardous waste, so dropping them in the red-lid bin is both illegal and a genuine fire risk. Recycle them instead—most services are free and take less time than a coffee run.
Recommended drop-off points:
- B-cycle bins at Bunnings, Officeworks and selected IGA stores
- Battery World retail counters (all chemistries accepted)
- Council hard-waste depots and transfer stations
- MobileMuster outlets that accept power-tool style packs
Before transport, tape over the exposed terminals, place each pack in a separate zip-lock bag and keep them upright in a cardboard box. Some recyclers offer small cash-back vouchers, so ask at the counter—your next DIY project might be partly paid for.
Putting It All Together
A tired battery is the simplest fault to diagnose and the cheapest to cure on a modern roller shutter. Once you’ve:
- Spotted the tell-tale signs of fade (slow travel, warning beeps)
- Matched a plug-and-play kit to your controller
- Weighed the true DIY versus technician costs
- Followed the screwdriver-level swap outlined above
- Adopted a quick maintenance routine to pamper the new pack
—you’ve effectively reset the clock on your shutter for another five-plus years.
Remember, the formula for a drama-free replacement is simple:
Correct Kit + Careful Installation + Consistent Top-ups = Reliable Shutter
Most homeowners manage the job in under an hour and pocket a sizable saving, but there’s no shame in calling a pro if heights, warranties or deeper electrical issues are in play. The main thing is restoring smooth, secure movement before a flat battery becomes a stuck-closed security risk.
If you live in Adelaide and would rather leave the spanners in the drawer, the team at Roller Shutter Repairs Adelaide can supply, fit and recycle your battery on the same day—no call-out fee, no guess-work, just working shutters.