How to Pair a Roller Shutter Remote: Troubleshooting Tips
Remote won’t pair, shutter jogs but goes nowhere, or the Up/Down buttons act backwards? You’re not alone. After a battery swap, a power outage, or moving into a new place with mystery handsets, many roller shutters refuse to cooperate until they’re taught the right code in the right order.
The good news: pairing a roller shutter remote is a simple sequence once you know your brand, frequency and learn‑mode steps. This guide walks you through a safe, step‑by‑step process to identify your gear, put the motor or controller into programming mode, teach the first handset, set accurate limits to protect the motor, and add extra remotes or group channels—plus fixes when pairing fails.
Below you’ll find clear instructions, quick checks for batteries, range and RF interference, and brand‑specific shortcuts for Somfy RTS, Ozroll E‑Port RF, Alpha tubular RF and Neco controllers. We’ll finish with practical troubleshooting and when it’s smarter to call a local technician in Adelaide. Let’s get your shutters responding on the first press.
Step 1. Confirm compatibility: brand, model, frequency and coding method
Before you learn how to pair a roller shutter remote, confirm the handset and motor use the same radio standard. Check the stickers on both for brand, model, frequency and coding. You must match frequency (433 or 868 MHz) and coding type (rolling‑code or fixed DIP); mismatched gear won’t learn. Example: a Somfy RTS remote won’t pair with an Ozroll E‑Series head. Typical systems include Somfy RTS/IO, Neco, Alpha RF and Ozroll E‑Port RF.
Step 2. Prepare safely: isolate power, access the motor and gather tools call us we take care of this 0414611662
Safety first: switch off power at the isolation switch or breaker, and only re‑energise the single shutter you’re pairing. Remove the pelmet cover or access panel to reach the motor head or wall controller and its recessed PROG/LEARN button. Work with good lighting, stable footing, and keep fingers clear of the moving curtain.
- Paper clip/small screwdriver: For recessed programming buttons
- Torch and step ladder: To access pelmets safely
- Fresh batteries: CR2430/CR2032 for the remote
- Phone + pen: Manual on your phone; note channel assignments
Step 3. Decide whether to reset: soft reset vs factory reset and when to use each
Before you learn how to pair a roller shutter remote, decide if a reset is needed. Clearing old codes prevents ghost pairings and timing conflicts. Typical resets: Somfy RTS—hold the recessed PROG about 7 seconds until two jogs; Neco—hold LEARN 15 seconds; Ozroll E‑Port—reinsert battery then hold UP+STOP 5 seconds for a single jog.
- Soft reset: Clears one channel only; use when a single handset or one shutter misbehaves.
- Factory reset: Wipes all paired remotes; use after moving in, losing a remote, or repeated failed pairing. Confirm success with a jog/beep/LED.
Step 4. Enter programming or learn mode on the motor or controller
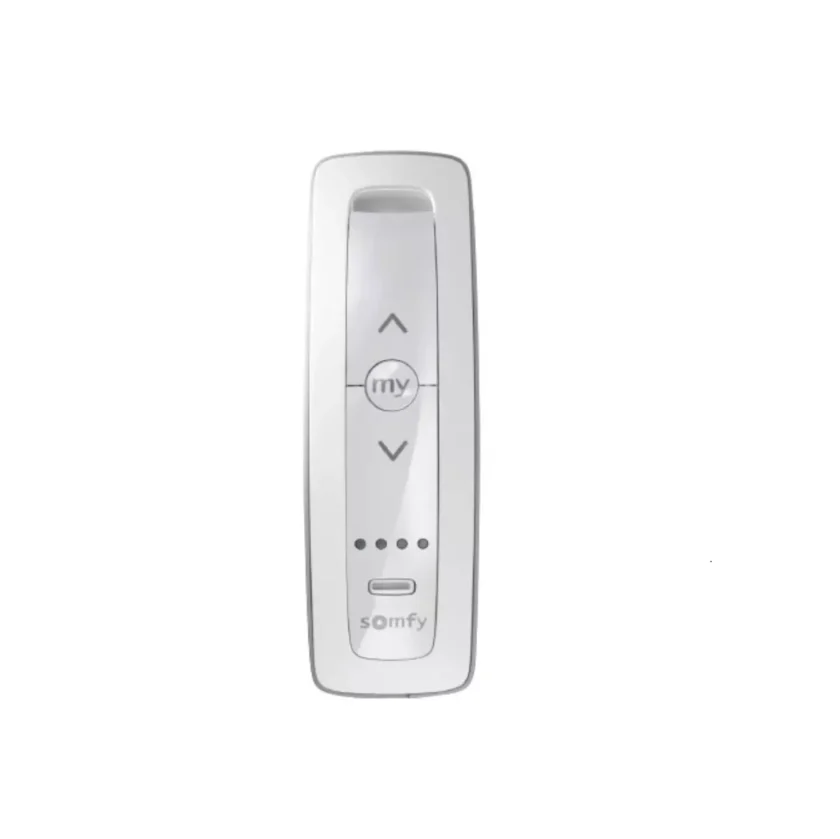
With only the shutter you’re working on powered, access the motor head or wall controller to enter learn mode so you can pair your roller shutter remote. Depending on the system, this step happens on the receiver or via the handset. Watch for a “jog”, beep or LED to confirm. If the shutter sits idle for around two minutes, most motors exit programming mode.
- Somfy RTS: press recessed PROG once — shutter jogs.
- Neco controller: tap LEARN — LED glows solid red.
- Alpha tubular RF: hold SET for 2 s — single beep.
- Handset‑driven systems: hold Up + Down until the curtain jogs; in this mode it moves only while buttons are held.
Step 5. Pair the first remote to a single shutter (teach signal)
With the receiver in learn mode and only this shutter powered, stand about 30 cm from the head unit and send the teach signal from the handset within 10 seconds. Look for a jog/beep or LED change to confirm the pair. If there’s no response, repeat quickly before learn mode times out.
- Somfy RTS: Press the remote’s recessed PROG once until the curtain jogs.
- Alpha tubular RF: Hold UP + DOWN for 2 s, then tap STOP once.
- Ozroll E‑Port RF: Press UP > STOP > DOWN in quick succession.
Step 6. Check travel direction and reverse it if necessary
After you pair the roller shutter remote, test direction: Up should lift, Down should lower. If it’s reversed, fix it now before setting limits. On many systems, hold Stop until the shutter jogs to swap direction (allow up to five seconds).
- Somfy RTS: Hold MY for 5 s.
- Neco: Press UP five times quickly.
- Alpha RF: Toggle the DIR DIP on the motor head.
Step 7. Set accurate upper and lower limits to protect the motor
Limits protect the gearbox, stop rattles, and prevent the bottom bar from jamming into the headbox. Set them immediately after you pair the roller shutter remote, and don’t leave the motor idle for more than two minutes or it may exit programming. Follow your brand’s method, but these universal steps apply.
- Enter limit mode: Hold Up + Down ~5 s until a jog.
- Set upper: Run to the exact open point; save (often hold Stop + Down until the motor moves, or tap Stop/MY).
- Set lower: Run to the correct Box Lock position; save (often hold Stop + Up).
- Confirm/save: Hold Stop until a jog; exit to user mode via the programming button.
- Tip: Stop before the bottom‑bar V stoppers to avoid a jam.
Step 8. Add extra remotes by cloning from a working handset
Once one handset works, you can clone extra remotes without touching the motor head. Use the programmed remote to put the receiver into learn, then teach the new remote within the time window.
- On the working remote: Hold the recessed PROGRAM/PROG until the shutter jogs (Somfy ~3 s; Neco LEARN twice).
- Within 10 s: Press or hold PROGRAM on the new remote until a jog.
- Clone complete: Repeat for each spare and note the channel used.
Step 9. Create group channels on multi‑channel remotes (operate multiple shutters)
Multi‑channel handsets let you create a group channel so one button moves several shutters together. Choose an unused channel (or the handset’s ALL channel—some brands label this as channel 5), then, with only one shutter powered at a time, put it into learn mode and send the teach signal from that chosen channel. Wait for the jog, power the next shutter, and repeat; then test the group.
Step 10. Adjust limits and save a favourite intermediate position in user mode
With pairing done, fine‑tune travel in user mode. Tweak limits on the fly and save a favourite gap. A jog confirms each save—act quickly if idle.
- Lower: To lower > hold Up+Down (jog) > adjust > hold Stop (jog).
- Upper: To upper > hold Up+Down (jog) > adjust > hold Stop (jog).
- Favourite: Move to gap > hold STOP/MY 5 s (jog) > long‑press recalls.
Step 11. Fix pairing failures: battery, range and RF interference checks
If you’ve followed the steps and the handset still won’t learn, treat it like an RF issue. Knowing how to pair a roller shutter remote often comes down to clean power, a healthy battery and a clear signal path. Work through these quick wins before blaming the motor or the remote.
- Fit a fresh battery: Install a new CR2430/CR2032 in the remote.
- Mind the distance: Stand ~30 cm from the receiver—too close can overload RF.
- Act within the window: Re‑enter learn mode; send the teach signal within 10 seconds.
- Cut interference: Briefly pause Wi‑Fi/baby monitors; move away from metal objects.
- Free memory: If the receiver’s memory is full, clear a slot, then re‑pair.
Step 12. Fix movement issues: short bursts, thermal overloads and obstructions
If the shutter only creeps in short bursts, stalls mid‑travel, or stops after a few seconds, it’s usually safety logic, heat protection or a physical jam—not your pairing. Work through these quick checks before you reprogram anything.
- Short bursts: Controller in “step” mode; hold STOP/MY 5 s to clear.
- Thermal overload: Let the motor cool for 15 minutes, then retry.
- Obstructions/jam: Clear debris, straighten slats, set limits to avoid the bottom‑bar V stoppers, and confirm the Box Locking System position.
- Power faults: Check the isolation switch/breaker; persistent no‑move can be a tired motor capacitor or loose neutral—book a licensed tech.
Step 13. Brand‑specific quick steps: Somfy RTS pairing and resets
Somfy RTS quick steps—pair roller shutter remote: tap head unit PROG once (jog), then tap handset PROG until a jog confirms. Clone: hold PROG on working remote ~3 s (jog), then tap PROG on new remote. Reset: hold PROG ~7 s to two jogs. Reverse: hold MY 5 s.
Step 14. Brand‑specific quick steps: Ozroll E‑Port RF pairing and resets
Ozroll E‑Port RF quick steps—pair: first put the receiver into learn mode, then on the E‑Port handset press UP > STOP > DOWN in quick succession; a jog confirms. Reset: remove the battery, reinsert, then hold UP + STOP for 5 seconds until a single jog. Send within 10 s, ~30 cm away, then re‑test.
Step 15. Brand‑specific quick steps: Alpha tubular RF pairing and resets
Alpha tubular RF motors pair fast at the head unit. Use these essentials for pairing and resets.
- Learn: Hold SET 2s (beep).
- Pair: Hold UP+DOWN 2s, then tap STOP (jog).
- Reset/clear: Power off 2s > on 10s > off 2s > on; hold remote PROGRAM 10s (jog).
Step 16. Brand‑specific quick steps: Neco controller pairing and memory management
On Neco controllers: tap LEARN once (LED solid), then press the remote within 10 s; a jog confirms. To add another fob, press LEARN twice until a jog, then press the new remote. Factory reset: hold LEARN 15 s. Clear old codes/memory: hold LEARN 20 s until three jogs.
Step 17. Manage channel memory, label your channels and secure your codes
Receivers fill fast—most hold 12–16 codes. Manage memory, label channels, and secure remotes to prevent pairing headaches and lapses.
- Free memory: Somfy PROG 8 s; Neco LEARN 20 s (three jogs). Re‑add only active remotes.
- Label channels: Keep a simple log (channel/location/group) taped inside the controller.
- Group hygiene: Use one ALL/group channel; avoid duplicate assignments across random channels.
- Security: If a remote is lost or you’ve moved, perform a factory reset and re‑pair only your own handsets.
Step 18. When to call a professional technician in Adelaide
After correct matching and resets, if pairing still fails or movement stays erratic, call a qualified Adelaide roller‑shutter technician to avoid damage and electrical risk. Professional diagnosis is essential for electrical faults and mechanical jams.
- No movement/learn mode: Won’t move or can’t enter learn mode.
- Persistent trips/step‑moves: Thermal trips or step‑moves persist.
- Mechanical/electrical faults: Grinding, off‑square curtain, jams at bottom‑bar stoppers, or suspected capacitor/neutral issues.
If you’re still stuck 0414611662
You’ve worked through compatibility, safe prep, resets, learn mode, the first teach, checked direction, saved limits, then added extra remotes and groups—and tackled RF, battery and power checks. That sequence solves most pairing headaches. Take your time with timing windows, watch for the jogs/beeps, and avoid leaving the motor idle in programming for more than a couple of minutes.
If you’re still wondering how to pair a roller shutter remote after all that, it’s likely a receiver fault, wiring issue or mechanical jam. Skip the guesswork and book fast, local help with the Adelaide specialists at Roller Shutter Repairs Adelaide. We offer no call‑out fees, prompt response, and seasoned technicians who’ll get your shutters moving properly again.