Roller Shutter Parts Diagram: Identify Every Component
Ever stared at a jammed roller shutter, certain one tiny piece has failed but not sure what it’s called, let alone where to buy another? You’re not alone—mis-naming a part is the quickest way to waste time, order the wrong gear and stay stuck.
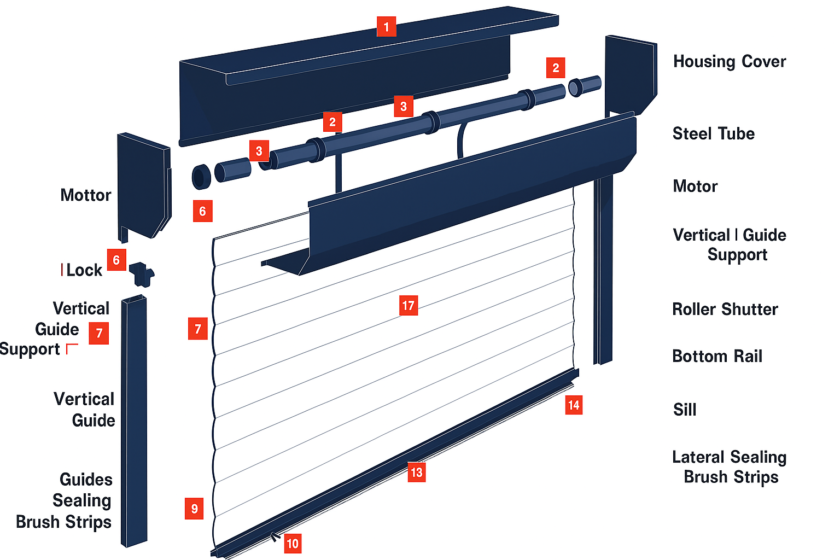
This guide supplies the clarity missing from most manuals: a high-resolution, numbered diagram of a standard domestic roller shutter, followed by an A–Z breakdown of every component for both manual and motorised systems. Armed with the correct names, local sizes and Australian measurements (with UK/US synonyms noted), you’ll know exactly which strap, axle, clip or motor suits your repair. Let’s start with a quick look at the entire anatomy before we zoom in on each section.
At-a-Glance Anatomy of a Roller Shutter
Before you grab a screwdriver, it helps to see how every piece fits together. The exploded sketch we supply below is the same layout used by most Aussie manufacturers, so the numbers will line up with the gear on your wall.

Why Knowing the Parts Matters
Naming parts correctly:
- keeps you safe by ordering the right rated spring or motor
- slashes downtime—no guesswork, no double freight
- lets you speak the same language as the technician or supplier
Everyday wins:
- swap a frayed strap
- click new V-stoppers into place
- size a motor for an electric conversion
- diagnose noise from a worn bearing
Terminology Cheatsheet
| Australian term | Common synonym |
|---|---|
| Pelmet | Head Box |
| End Plate | Cheek Plate |
| Axle Drum | Octagonal Tube |
| Guide Channel | Side Track / Rail |
| Bottom Rail | Bottom Bar |
| Wind-Lock Pin | Anti-Lift Clip |
Head Box and Roller Assembly Explained
Open the pelmet and you’ll find the cluster of parts that do the heavy lifting. Most domestic shutters share the same basic layout, so once you understand this core, the rest of the curtain is straightforward.
Pelmet / Head Box Housing
The pelmet (often called the head box) hides the works, keeps weather out and gives the façade a neat finish. Domestic units are usually powder-coated aluminium or steel and come in three square profiles: 165 mm, 205 mm and 250 mm. Installers either face-fit the box to the wall or reveal-fit it inside the window recess—measure depth before ordering replacements to avoid a clash with brickwork.
End Plates & Box End Inserts
End plates are the triangular side cheeks that bolt the pelmet to the wall and carry the shutter’s full weight. A quick glance reveals left and right plates: the motor or strap normally exits through the right-hand plate. Look for hairline cracks around the spindle hole or oval-shaped bolt slots—both signal fatigue and a need to swap the plate or add reinforcing inserts.
Roller / Axle Tube
Inside the box sits an octagonal or round steel tube (Ø 50–70 mm) that the curtain wraps around. Slats clip to the drum via nylon bearings or spring fasteners; missing clips cause the curtain to skew. When removing the tube, mark its original orientation so balance weights and motor crown go back in the same place.
Spring Mechanism or Tubular Motor
Manual shutters rely on a torsion spring wound around the axle. Treat it with respect: even a 1 m² curtain can store dangerous energy—always clamp the drum before loosening grub screws. Electric models replace the spring with a sealed tubular motor that slips inside the axle. Pick torque based on area—rough rule: 6 Nm per square metre—and wire through a dedicated 10 A circuit. Most motors include an emergency crank socket; keep the handle handy for blackouts.
Curtain, Slats and Bottom Bar Components
Think of the curtain as the business end of the roller shutter: it’s the moving wall that keeps weather, light and would-be intruders at bay. While the assembly looks like a single sheet, it’s actually a series of cleverly connected parts that must stay tight and square if the shutter is to glide smoothly. Below we unpack the four key elements you’ll meet once the pelmet is off.
Interlocking Slats
Most domestic curtains use double-walled aluminium slats filled with polyurethane foam for added rigidity and insulation. The male–female edges snap together, creating a strong hinge that still allows the curtain to roll tightly. Common exposed face sizes are 36 mm, 42 mm and 55 mm; match the profile when ordering replacements or the stack height will change. Besides boosting thermal and acoustic performance, intact slats act as a solid deterrent—dent one and overall strength nosedives.
Slat Inserts, End Locks and V-Stoppers
Tiny but vital, these nylon or metal pieces keep each side of the curtain aligned in the guide channels. End locks stop lateral creep, while V-stoppers prevent the bottom slat from over-rotating on the drum. Telltale wear signs include elongation of the fixing hole or a shiny rub mark on one side. Always replace inserts in symmetrical pairs so the curtain stays balanced.
Bottom Bar / Bottom Rail
The bottom bar is a thicker, solid-walled extrusion that adds weight so the curtain drops cleanly. It can house keyed centre locks, sliding shoot bolts or simple spring clips, depending on the security level you need. Optional extras include a rubber weather strip or soft brush to cushion the landing and cut noise. Keep pivot pins lightly lubricated with silicone spray once a year to stop squeaking.
Weather Seals & Brush Strips
Seals run along the bottom rail and sometimes inside the guide channels. They block draughts, dust and insects, and reduce light bleed for shift-workers chasing daytime darkness. Clean every six to twelve months with mild detergent and a soft brush—harsh chemicals make rubber brittle and shorten the seal’s lifespan.
Guide Channels, Side Frames and Security Add-Ons
The side gear is less glamorous than motors and slats, yet most breakdowns start here. Bent tracks or a seized bearing can make a perfectly good curtain scrape, jam or even fall. Give the following parts a two-minute once-over each service and you’ll head off 90 % of guide-related call-outs.
Guide Rails / Tracks
U-shaped aluminium channels lined with felt or brush keep the curtain centred and quiet. Measure inside width and depth with a vernier before ordering replacements—common sizes are 53 × 22 mm and 65 × 25 mm. A handful of leaves or mud can wedge behind the brush, so blast tracks with low-pressure air or a garden hose; if the shutter still sticks, suspect a warped rail.
Bearings, Pins
Tucked inside the end plates, these pins support the axle and let it spin freely. A grinding noise, metal dust, or one side of the curtain hanging low signals the bearing has ovalised—swap it before it chews the shaft. (See call-out photo in the diagram.)
Anti-Lift & Wind-Lock Devices
Hook locks and side-locking pins snap into the bottom slat; wind-lock fins slot into the guide rail to stop the curtain blowing out under pressure. Coastal or cyclone-prone areas often specify wind-locks to AS 4040.3—check your council requirements.
Mounting Hardware & Fixings
Use stainless or zinc-plated tek screws for aluminium frames and masonry anchors for brick. Cheap untreated steel rusts fast, stains render, and can loosen, letting the whole assembly shift. A $5 bag of proper screws beats a $500 repair.
Operating & Control Mechanisms
How you drive the curtain—by hand, switch or smartphone—dictates both day-to-day convenience and long-term maintenance. Use the overview below to match the right control gear to your existing roller shutter parts diagram and spot issues before they snowball.
Manual Winding Systems
The classics: webbing strap winders, nylon cord winders and external crank handles.
- A spring-loaded wheel in the wall box stores the strap; fraying edges or a clacking ratchet mean the wheel or pawl is worn.
- Cord winders suit narrow windows but cords stretch faster in the Adelaide sun—replace every 3–5 years.
- Crank handles bypass wall cavities, making them ideal for double-brick retrofits; grease the universal joint yearly.
If the shutter refuses to rise, check the strap hasn’t derailed from the axle drum (see earlier PAA note).
Electric Controls
Tubular motors are wired to a wall rocker, keyed switch, RF remote or Wi-Fi hub. After installation:
- Press and hold the program button to set upper and lower limits.
- Test stopping accuracy within 10 mm; adjust via the inline screws or app.
Interference from metal lintels can shorten remote range—fit an external antenna if range drops below 15 m.
Safety Brakes & Obstacle Detection
Larger openings (garage or shopfront) use a centrifugal safety brake that locks the axle if descent exceeds ≈ 1 m/s. Domestic 240 V motors rely on amperage sensing: the motor stalls at a preset current spike, protecting kids’ fingers and pets. Both systems must meet AS 5036—ask for the compliance decal inside the pelmet.
Smart Home & Solar Upgrades
Solar kits pair a roof-mounted 20 W panel with a 12 V lithium battery and 10–30 Nm motor—perfect for windows lacking mains power. Most models speak Zigbee or Wi-Fi, letting you schedule “down” at sunset for passive cooling. Caveat: shaded façades may need an oversized panel or occasional USB top-up. A smart gateway also enables voice commands via Google Assistant or Alexa, adding security presence simulation when you’re away.
Spotting Problems and Inspecting Parts Like a Pro
Print the roller shutter parts diagram, grab a torch and spend five minutes on the checks below. Routine walkthroughs catch 90 % of faults before they mushroom into costly repairs.
Visual Inspection Checklist
- Isolate power or lock the winder.
- Pop the pelmet lid and look for loose screws or metal shavings.
- Rotate the axle half a turn—listen for grinding.
- Drop the curtain slowly and watch both guide channels for drag.
- Check end locks, V-stoppers and bottom-bar seals are intact.
- Confirm motor cable or strap isn’t frayed or kinked.
- Re-fit pelmet, restore power.
Common Failure Symptoms Mapped to Parts
| Symptom | Likely culprit | Quick test | Temporary fix |
|---|---|---|---|
| Won’t lift | Derailed strap | Tug strap—no tension? | Re-thread onto drum |
| Stops mid-way | Motor limit off | Hold “down” button—moves? | Reset limits |
| Crooked curtain | Missing end lock | Measure gap each side | Fit new locks |
| Loud clunk | Worn bearing | Spin axle by hand | Spray silicone |
Decide: DIY or Call a Technician
DIY is fine for straps, seals or end locks. Jobs involving spring tension, mains wiring or shutters wider than 2.4 m should go straight to a licensed Adelaide technician—your fingers and insurance will thank you.
Measuring and Matching Replacement Parts
A quick tape-measure session saves days of returns. Jot the figures on the printed roller shutter parts diagram and keep them in your phone before you hit the checkout.
Accurate Slat and Guide Channel Dimensions
Remove one mid-height slat, lay it flat, and record overall face width, wall thickness and interlock depth with a vernier. Measure guide channel inside width and depth—both must allow 2–3 mm clearance for smooth travel.
Selecting Correct Motor Torque & Axle Size
Use Torque (Nm) = (width × height × weight-factor) ÷ 1000. Domestic aluminium curtains average 6 kg / m². Round up to the next motor size and match the axle’s diameter (commonly 60 mm octagonal).
Colour and Finish Matching
Note the Colorbond or Dulux powder-coat code stamped inside the pelmet: e.g., Monument® or Classic Cream®. Order slats, pelmet lids and touch-up spray in the exact code to avoid patchy façades.
Buying Roller Shutter Parts in Australia
Armed with sizes from your roller shutter parts diagram, the next step is ordering gear that arrives on time and fits first go. Avoid overseas delays and warranty headaches by following the tips below.
OEM vs Aftermarket: Pros and Cons
The choice affects cost and hassle:
- OEM – perfect fit, colour-matched, pricier, 12-month warranty
- Aftermarket – cheaper, readily stocked, check dimensions twice
What to Look for in a Supplier
Tick these boxes before you pay:
- AS-certified parts
- Marine-grade screws
- Clear returns policy
- Local warehouse for fast swaps
- Phone support—not just email
Toolbox: Essential Spares to Keep on Hand
Stock these basics in the shed:
- Spare strap roll
- Pair of end locks
- Drive wheel
- Box of tek screws
- Silicone spray
These small items can rescue a weekend repair.
Quick Answers to Popular Questions
- Main parts? Pelmet (head box), end plates, axle, spring or motor, interlocking curtain slats, guide channels, bottom bar, weather seals.
- Life expectancy? Typically 12–30 years; salt air, poor cleaning and untensioned springs shorten it.
- Stuck halfway? Check for derailed strap / cable, mis-set motor limits, or debris in guides.
- Convert manual to electric? Yes—fit a tubular motor, add control gear, budget roughly AU$250+ for parts.
- Diagram PDF? Download the free high-res file from the “At-a-Glance Anatomy” section above.
Keep Your Shutters Rolling Smoothly
Pinning the right name to the right part is half the battle; the other half is keeping those parts clean, lubricated and tensioned. Print the diagram, do a five-minute check each season and swap worn straps, seals or bearings before they snowball into a seized shutter. When you do need replacements, stick with AS-certified components so everything clicks together first time and lasts years, not months. If the job feels risky—or you simply want it done today—ring the local experts at Roller Shutter Repairs Adelaide and we’ll get it rolling again.