How Roller Shutters Work: Manual & Electric Operation Guide
A roller shutter is basically a curtain of interlocking aluminium slats that winds around a tube hidden inside the top pelmet. Turn a manual winder and a pre-loaded spring takes most of the weight; press a switch and a tubular motor supplies the torque. Guides keep the curtain straight, limit stops halt it precisely, and the result is secure, insulated and remarkably simple engineering.
Understanding that core motion makes buying, operating or fixing shutters far less mysterious. Over the next minutes we’ll map every part of the system, show what happens during each cycle, compare straps to motors, and flag the maintenance tasks that stop jams before they start. By the end you’ll know which set-up suits an Adelaide home or business and how to keep it running.
Roller Shutter Components and Terminology
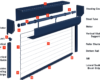
Before we dig into how roller shutters work, it helps to put names to the bits you’re staring at. Australian installers may swap “headbox” for “pelmet” or “gear tape” for “strap”, but the hardware is largely the same. At a glance, a roller shutter is made up of:
- curtain of slats
- axle (barrell)
- side guides
- bottom rail
- pelmet front & back with end plates
Each element plays a distinct role, and spotting which one is faulty makes troubleshooting a breeze.
Roller Curtain & Slats
Most residential shutters use double-skinned aluminium slats filled with polyurethane foam for insulation. The slats hinge together via a simple male-to-female profile, letting them curve around the barrel without gaps. Punched slots or perforations allow airflow and filtered light when the shutter is partially raised. Typical weight: 3–4 kg per square metre.
Roller Barrel / Axle
Hidden inside the pelmet, the steel or aluminium barrel carries the curtain. Bearings in each end plate let it spin freely while a pre-loaded torsion spring or tubular motor sits inside. Diameters range from 50 mm on small windows to 70 mm on very large shutters.
Side Guides / Tracks & Wind Locks
U- or H-shaped extruded aluminium tracks are fixed either side of the opening. Nylon brushes reduce rattles, while stainless wind-lock clips on cyclone-rated models prevent the curtain blowing out during South Australian storms.
Bottom Rail
An extruded bottom rail adds weight for smoother travel, seals against drafts and houses manual slide bolts or key locks if thats an option you choose. Motorised shutters often use an internal auto-locking mechanism that engages whenever the motor stops.
Pelmet (Headbox) & End Plates
The powder-coated pelmet (150–250 mm deep) protects everything from weather and prying fingers. Removable face or underside panels give service access. Circular end plates at each end support the barrel and carry the spring or motor hardware.
How the Rolling Mechanism Works
Turn the handle or tap the remote and the shutter does a quick physics lesson behind the pelmet. Stored energy—either in a torsion spring or a motor winding—overcomes gravity, shifts the curtain upward and keeps it exactly where you leave it. Understanding the three micro-stages below helps when you’re diagnosing a slow or lopsided shutter.
Counterbalance Springs vs Motor Torque
spring operated units rely on a pre-loaded torsion spring inside the barrel. The spring is wound during installation so its stored force (F = k × θ) almost equals the curtain’s weight, meaning you only feel a kilogram or two on the winder. Electric models skip the spring on small shutters; a tubular motor generates the required torque (measured in Nm) at the press of a switch. Large commercial shutters sometimes use both, letting a smaller motor share the load and run cooler.
The Lift Cycle
As the axle turns, each slat pivots on its interlock, wrapping smoothly around the barrel to form a tight coil. More curtain height means a larger roll diameter, so bigger shutters need a fatter barrel to avoid scraping the pelmet. Nylon brushes in the side guides steady the curtain, while wind-locks slide neatly past recesses without binding.
Limit Stops and Safety Brakes
Manual straps usually incorporate a simple pawl-and-ratchet that stops back-drive. Motors use electronic or mechanical limit switches set during commissioning; hit the upper or lower limit and power cuts instantly. Industrial shutters add fall-arrest brakes that clamp the axle if a spring or motor fails, preventing a dangerous free-fall.
Manual Roller Shutters: Operation, Advantages and Limitations
“How do manual roller shutters work?” The short version is that your arm replaces the motor. A webbed polyester strap or geared crank connects to the barrel inside the pelmet; when you wind, the counter-balanced spring inside the axle does most of the lifting while you simply guide the curtain to the height you want. The set-up is simple, cheap and completely independent of electricity—handy during the odd South Australian blackout.
Strap or Tape Winder Systems
- Pull or rotate the interior winder; the strap winds onto a plastic drum.
- The drum’s spindle turns the axle tube, unwinding the pre-loaded torsion spring.
- Spring force lifts the curtain; nylon brushes keep it centred in the guides.
- Release the handle and a built-in ratchet holds position; unwind to lower.
Typical wear points are a frayed strap, cracked drum or a loose handle screw—
Cord & Pulley vs Crank Handle Variants
Older shutters use a cotton cord and ceiling-mounted pulley—fine for tiny windows but prone to stretch. Modern crank handles employ a 3:1 or 5:1 gearbox, slashing effort and allowing heavier curtains (up to ~3 m²) without huffing and puffing.
Pros, Cons & Ideal Use Cases
- Pros: lowest upfront cost, no wiring, works in a power cut, straightforward DIY maintenance.
- Cons: physical effort, size and height limits, interior strap box can look clunky.
- Best suited to ground-floor bedrooms, sheds and rental properties where budget outranks gadgetry.
Electric Roller Shutters: Motorised Operation and Control Systems
Swap the strap for a motor and the whole experience changes: fingertip control, larger openings and the option to automate every cycle. An electric roller shutter relies on a slim tubular motor hidden inside the axle. Once the motor receives a signal, it turns the barrel, lifts the curtain, then stops exactly where its internal limits tell it to—no guess-work, no over-run.
Tubular Motor Anatomy
A tubular motor is essentially a small gear-reduced engine wrapped in an aluminium can:
- Voltage: 240 V AC for most homes, 12 / 24 V DC in battery models
- Torque: 10–60 Nm for residential windows, up to 120 Nm on patio doors
- Speed: ~12 rpm, translating to 30–40 mm / s curtain travel
- Extras: in-built thermal cut-out to prevent burnout after heavy use
Drive adaptors connect the motor shaft to the axle tube, while a star bracket fixes the non-driven end to the cheek plate so only the shaft rotates.
Wiring, Switches & Remotes
Hard-wired shutters run to a nearby isolation switch (AS/NZS 3000 requirement) and a momentary wall rocker. Security shutters often add a keyed switch. Pair a plug-in RF receiver and you gain radio remotes that work through brick walls—ideal when the bed or shop counter is metres away.
Battery & Solar Motor Options
Where wiring is tricky, a low-voltage motor with an internal lithium pack is the go. A north-facing 5 W solar panel trickle-charges the battery, giving 50–80 cycles between full charges—plenty for an Adelaide winter. Installation needs no electrician, making it popular for heritage facades.
Safety & Obstacle Detection
“How does a roller shutter know when to stop?” Each motor stores upper and lower limit positions in memory. Modern models add:
- Current-sensing overload: shuts off if the curtain hits an object or ice build-up – not in every motor – this motor is an upgradable option
- Optical or mechanical bottom-bar sensors: trigger auto-reverse on contact – upgradable option
- Soft-start/stop ramps: reduce jolts and extend slat life
These features keep fingers safe, protect the motor and comply with Australian consumer safety expectations.
Choosing and Installing Power Options: Mains, Battery, Solar and Retrofits
Your power source sets the budget, installation effort and future automation options. Understand how roller shutters work, then choose mains, battery or solar to suit South Australian conditions.
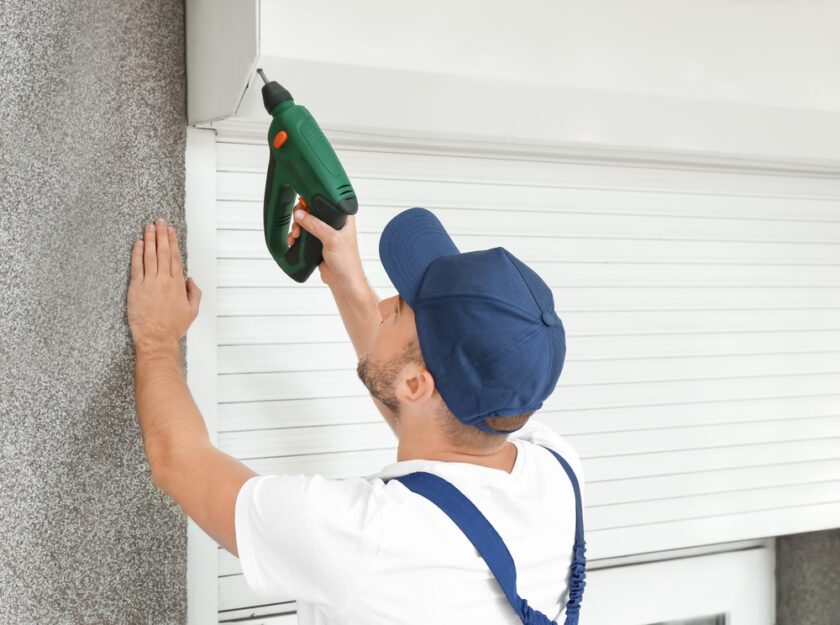
Retrofitting Manual Shutters to Electric
A technician removes the strap, swaps the barrel for a motor tube, and patches the interior winder hole. Typical bedroom window: 1–2 hours, around AUD 600–850 in Adelaide (motor, switch, labour). Guides and pelmet stay untouched.
Mains Power Requirements
You’ll need a nearby GPO or junction box, 1 mm² twin-active cable inside the wall, and an isolation switch within sight of the shutter. Australian Standard AS/NZS 3000 requires a licensed sparkie.
Low-Voltage Battery/Solar Considerations
A 12 V motor with internal lithium pack skips wiring entirely. Mount the 5–10 W panel facing north at 30–35°. Adelaide sun delivers about 60 cycles a week; cloudy days draw on stored charge for worry-free operation.
Automation, Sensors and Smart Home Integration
Motorised shutters really shine once you add brains to the brawn. Affordable plug-in receivers or built-in radios let you run multiple shutters as a group, schedule daily cycles and link everything to a smart-home hub.
Control Options
Choose single-gang wall switches, three-position key switches for shopfront security, or RF remotes that operate through brick—ideal for grouping every bedroom window.
Environmental Sensors
Clip-on light and temperature sensors can drop the shutters for passive cooling, while wind or rain sensors protect veranda café blinds before the weather turns nasty.
Smart Home Platforms
Most 433 MHz or RTS radios integrate with Google Home, Alexa, Tahoma or HomeKit via a Wi-Fi bridge.
Care, Troubleshooting and Common Repairs
Roller shutters are low-maintenance by design, but a little TLC stops them squeaking, binding or—worst case—getting stuck half-open when a storm rolls in. The good news is that most everyday issues such as a sluggish curtain, a frayed strap or a noisy motor can be spotted early and fixed with basic tools. Follow the checklist below and you’ll stretch service intervals, avoid emergency call-outs and keep that insulation rating right where it should be.
Routine Maintenance Checklist
- Quarterly: vacuum or hose out side guides, then wipe the curtain with mild detergent; check bottom-rail rubber for cracks.
- Six-monthly: cycle the shutter fully up and down ten times to keep springs and motors limber; listen for grinding or uneven travel.
- Yearly: lubricate axle bearings with a PTFE spray, re-tension manual springs if the curtain feels heavy, and test motor upper/lower limits.
- After high wind events: inspect wind-locks and guide brushes for damage or displacement.
DIY Fixes
- Roller shutter stuck half-way? Turn off power first, clear any debris in the tracks, then try again.
- Sagging manual strap: pop off the interior winder box cover and replace the $15 webbing—match the width and weave to the original.
- Roller shutter winder box repair: swap cracked plastic drums or worn ratchets; most brands use two Phillips screws and a clip-in drum.
- Motor limits drifting: press the programming buttons to reset top/bottom stops—refer to your motor’s code sheet.
- Light scraping noises: add a 1 mm nylon spacer behind the offending guide to realign the curtain.
When to Call a Professional
Ring an accredited technician if the motor hums but won’t turn, the curtain is jammed tight in the pelmet, slats are bent, or any 240 V wiring is exposed. Large commercial shutters carry serious spring tension—never attempt those repairs yourself.
Manual vs Electric: Price, Performance and Suitability
Knowing how roller shutters work is only half the battle—the other half is picking the drive system that matches your wallet, window size and lifestyle.
Cost Breakdown
- Manual strap kit + labour: ~AUD 300–450 per window
- Electric 240 V motor, switch, electrical labour: ~AUD 600–900
- Solar/battery upgrade: add AUD 150–250
- Running costs: manual = nil; electric ≈ 1 kWh per 200 cycles (about 40 c a year)
Performance & Convenience
- Opening speed: manual 7–10 s / m, electric 4–6 s / m
- Effort: arm power vs finger-tap/voice command
- Size limit: manual ≈ 3 m², electric up to 8 m²
- Blackout operation: manual yes, electric needs battery back-up
Decision Guide
Choose manual for small ground-floor windows, tight budgets, or off-grid sheds, this installation is very intrusive on your home and sometimes unsightly with straps, boxs and rollers on the inside. So think about if your happy to see this.
Go electric for larger doors, frequent daily use, smart-home integration, or occupants with limited mobility.
Final Thoughts
Understand the parts, remember the physics, and you’ll never look at a shutter the same way. A curtain rolling around a barrel—whether urged on by a spring-assist strap or a whisper-quiet motor—is simple, tough and surprisingly customisable. Pick manual if price and blackout resilience top the list; go electric when convenience, size or smart control matter more. Either way, a quick clean and an annual check keep everything humming for decades. Need help in Adelaide? Talk to the locals at Roller Shutter Repairs Adelaide for prompt repairs, upgrades or brand-new installs.